Disks & Storage
Adjust the size of a filesystem
A filesystem can be grown to make use of the free space after its partition. Often this is even possible while the filesystem is mounted.
To make space for another partition after the filesystem, it can be shrunk according to the free space within it.
Not all filesystems have resize support.
The partition size will be changed together with the filesystem size. It is also possible to resize a partition without a filesystem in the same way.
Resize a filesystem/partition
-
Open Disks from the Application Menu.
-
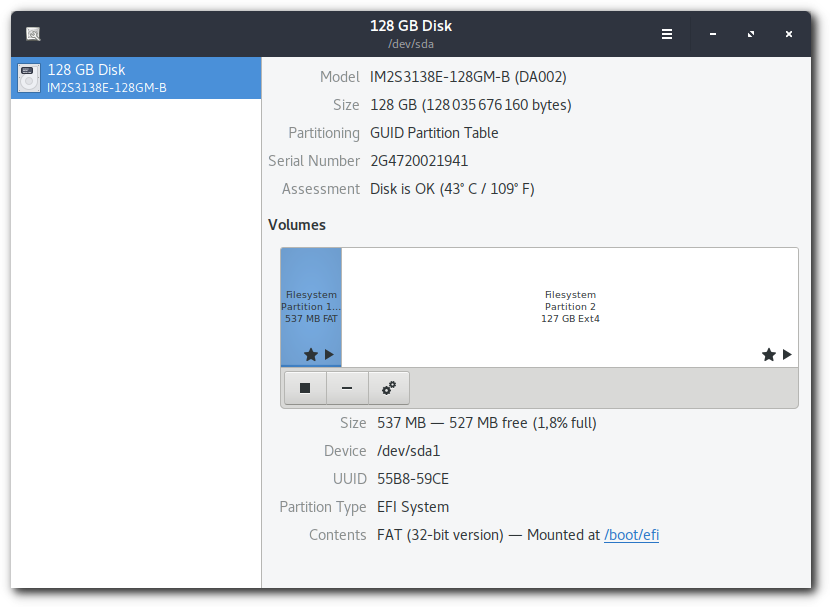
Select the disk containing the filesystem in question from the list of storage devices on the left. If there is more than one volume on the disk, select the volume which contains the filesystem.
-
In the toolbar underneath the Volumes section, click the menu button. Then click Resize Filesystem… or Resize… if there is no filesystem.
-
A dialog will open where the new size can be chosen. The filesystem will be mounted to calculate the minimum size by the amount of current content. If shrinking is not supported the minimum size is the current size. Leave enough space within the filesystem when shrinking to ensure that it can work fast and reliably.
Depending on how much data has to be moved from the shrunk part, the filesystem resize may take longer time.
The filesystem resize automatically involves repairing of the filesystem. Therefore it is advised to back up important data before starting. The action must not be stopped or it will result in a damaged filesystem.
-
Confirm to start the action by clicking Resize.
The action will unmount the filesystem if resizing a mounted filesystem is not supported. Be patient while the filesystem is resized.
- After completion of the needed resize and repair actions the filesystem is ready to be used again.

Check how much disk space is left
You can check how much disk space is left with Disk Usage Analyzer or System Monitor.
Check with Disk Usage Analyzer
To install Disk Usage Analyzer go to software center and search for Disk Usage Analyzer.
To check the free disk space and disk capacity using Disk Usage Analyzer:
-
Open Disk Usage Analyzer from the Activities overview. The window will display a list of file locations together with the usage and capacity of each.
-
Click one of the items in the list to view a detailed summary of the usage for that item. Click the menu button, and then Scan Folder… or Scan Remote Folder… to scan a different location.
The information is displayed according to Folder, Size, Contents and when the data was last Modified. See more details in Disk Usage Analyzer.
Check with System Monitor
To check the free disk space and disk capacity with System Monitor:
-
Open the System Monitor application from the Application Menu.
-
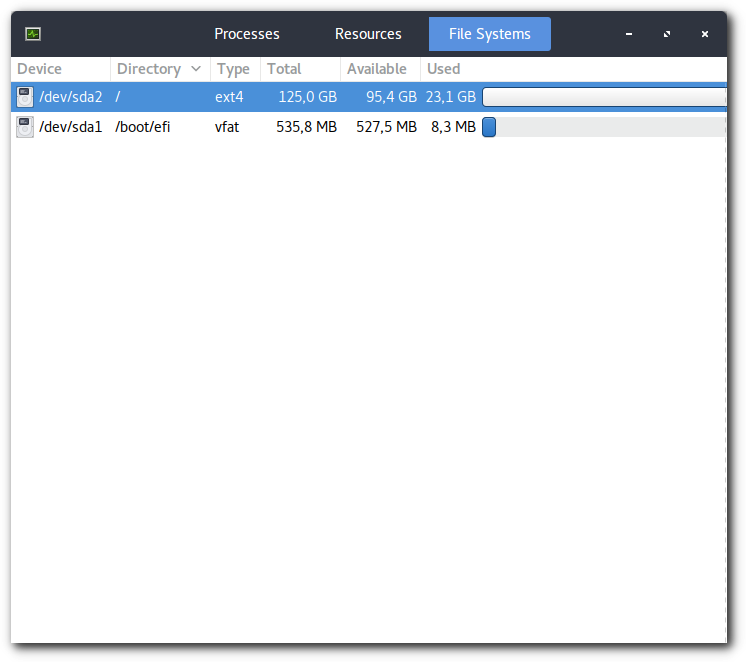
Select the File Systems tab to view the system’s partitions and disk space usage. The information is displayed according to Total, Free, Available and Used.

What if the disk is too full?
If the disk is too full you should:
-
Delete files that aren’t important or that you won’t use anymore.
-
Make backups of the important files that you won’t need for a while and delete them from the hard drive.
Check your hard disk for problems
Checking the hard disk
Hard disks have a built-in health-check tool called SMART (Self-Monitoring, Analysis, and Reporting Technology), which continually checks the disk for potential problems. SMART also warns you if the disk is about to fail, helping you avoid loss of important data.
Although SMART runs automatically, you can also check your disk’s health by running the Disks application:
Check your disk’s health using the Disks application
-
Open Disks from the Application Menu.
-
Select the disk you want to check from the list of storage devices on the left. Information and status of the disk will be shown.
-
Click the menu button and select SMART Data & Self-Tests…. The Overall Assessment should say “Disk is OK”.
-
See more information under SMART Attributes, or click the Start Self-test button to run a self-test.

What if the disk isn’t healthy?
Even if the Overall Assessment indicates that the disk isn’t healthy, there may be no cause for alarm. However, it’s better to be prepared with a backup to prevent data loss.
If the status says “Pre-fail”, the disk is still reasonably healthy but signs of wear have been detected which mean it might fail in the near future. If your hard disk (or computer) is a few years old, you are likely to see this message on at least some of the health checks. You should backup your important files regularly and check the disk status periodically to see if it gets worse.
If it gets worse, you may wish to take the computer/hard disk to a professional for further diagnosis or repair.
Test the performance of your hard disk
To test the speed of your hard disk:
-
Open Disks from the Application Menu.
-
Choose the disk from the list in the left pane.
-
Click the menu button and select Benchmark disk… from the menu.
-
Click Start Benchmark… and adjust the Transfer Rate and Access Time parameters as desired.
-
Click Start Benchmarking to test how fast data can be read from the disk. Administrative privileges may be required. Enter your password, or the password for the requested administrator account.
If Perform write-benchmark is checked, the benchmark will test how fast data can be read from and written to the disk. This will take longer to complete.
When the test is finished, the results will appear on the graph. The green points and connecting lines indicate the samples taken; these correspond to the right axis, showing access time, plotted against the bottom axis, representing percentage time elapsed during the benchmark. The blue line represents read rates, while the red line represents write rates; these are shown as access data rates on the left axis, plotted against percentage of the disk traveled, from the outside to the spindle, along the bottom axis.
Below the graph, values are displayed for minimum, maximum and average read and write rates, average access time and time elapsed since the last benchmark test.
Wipe everything off a removable disk
If you have a removable disk, like a USB memory stick or an external hard disk, you may sometimes wish to completely remove all of its files and folders. You can do this by formatting the disk — this deletes all of the files on the disk and leaves it empty.
Format a removable disk
-
Open Disks from the Application Menu.
-
Select the disk you want to wipe from the list of storage devices on the left.
Make sure that you have selected the correct disk! If you choose the wrong disk, all of the files on the other disk will be deleted! -
Click the menu button
 and select Format.
-
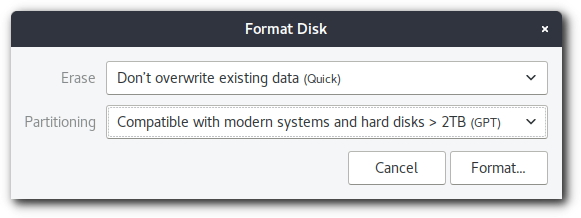
In the window that pops up, choose a file system Type for the disk.
If you use the disk on Windows and Mac OS computers in addition to Linux computers, choose FAT. If you only use it on Windows, NTFS may be a better option. A brief description of the file system type will be presented as a label.
-
Give the disk a name and click Format… to continue and show a confirmation window. Check the details carefully, and click Format to wipe the disk.
-
Once the formatting has finished, click the eject icon to safely remove the disk. It should now be blank and ready to use again.
